Settings
Updated: August 2026
Table of contents
- Overview
- Initial Setup Checklist
- Signing In
- Dashboard
- Patients
- Appointments
- Session Notes
- Messaging
- Invoices & Receipts
- Store: Gift Vouchers & Treatment Series
- Expenses
- Documents
- Tasks
- Analytics
- Leave & Closures
- Blocked Time
- Notifications
- Settings
- Message Templates
- Patient Portal
- Mobile Apps
- Exporting Your Data
- Things to Set Up Before Going Live
- Patient Status Quick Reference
- Common Questions
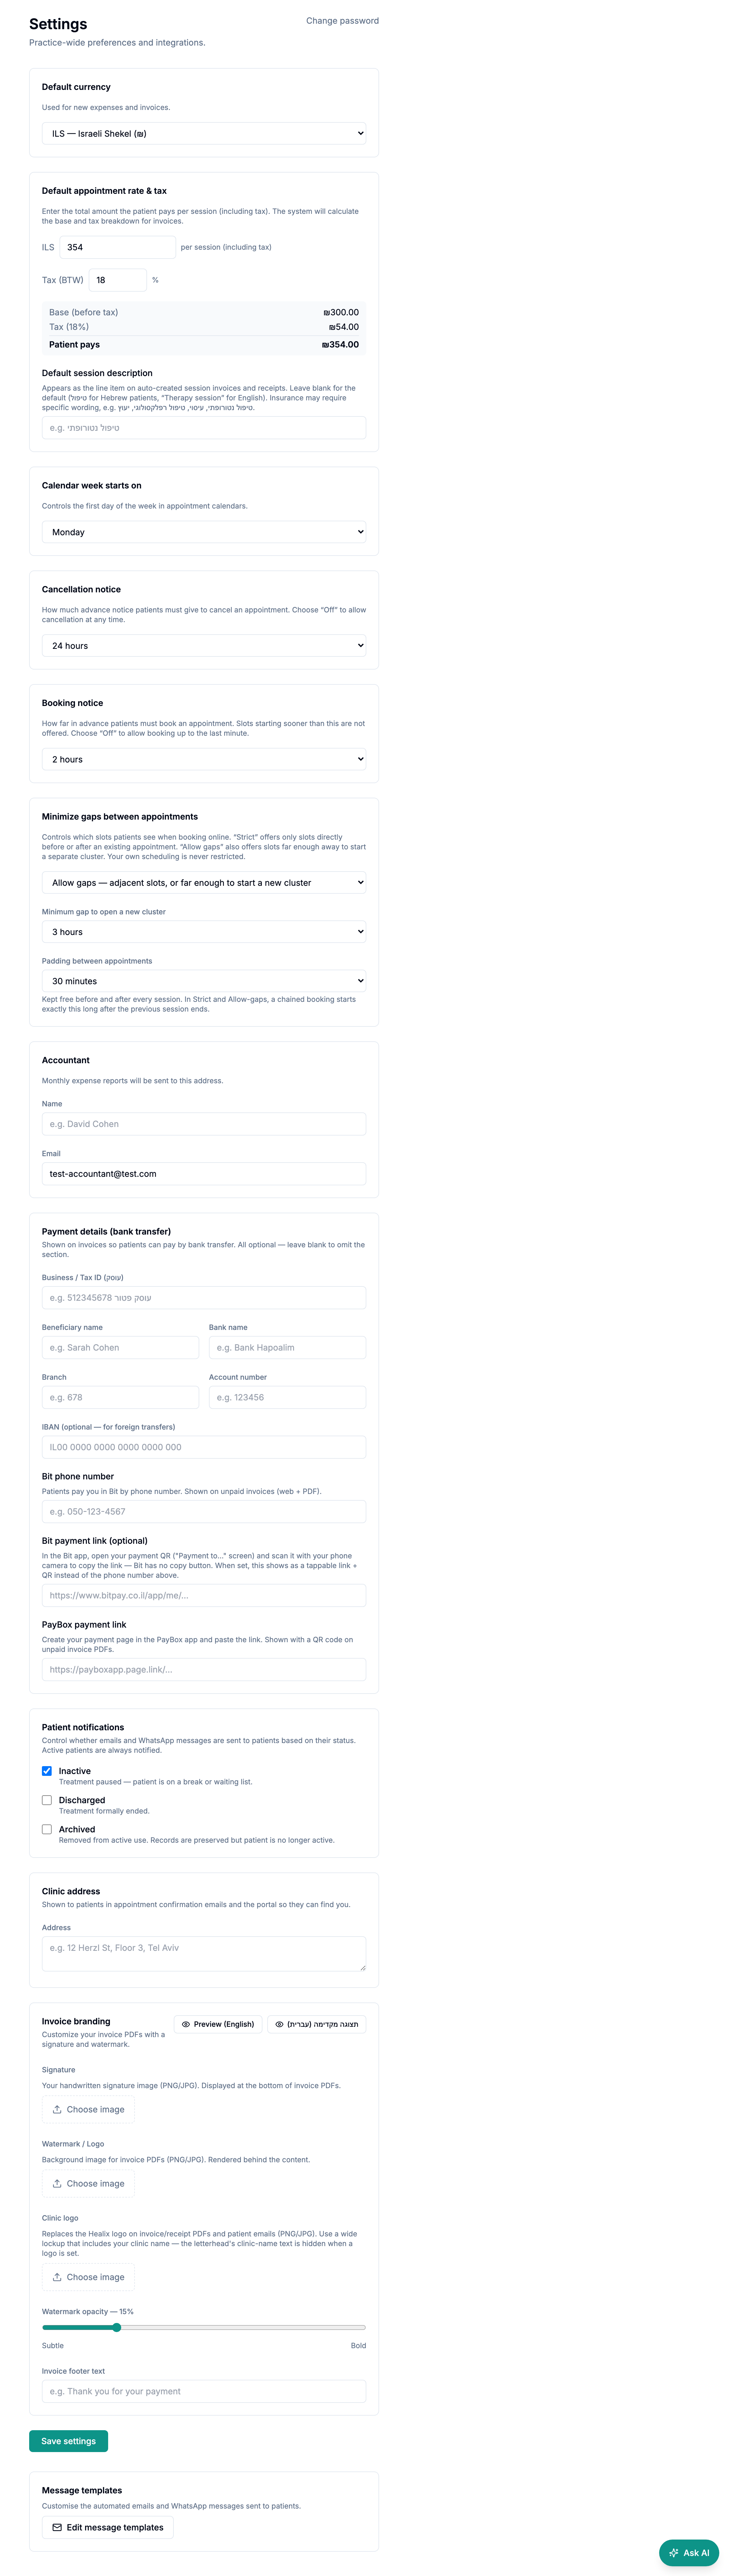
Go to Settings from the sidebar.
16.1 Default Currency
Sets the currency used for new invoices and expenses. Changing this does not retroactively update existing records.
16.2 Default Appointment Rate & Tax
- Default appointment rate — the total amount (including tax) the patient pays per session. Used when auto-creating invoices on appointment completion. Individual patients can have their own rate (set on the patient's edit page) which overrides this default.
- Tax rate (BTW) — your tax percentage. The system back-calculates: if you enter ₪354 rate with 18% tax, the invoice shows base ₪300 + tax ₪54 = total ₪354. All amounts are rounded to whole numbers.
- A preview below the fields shows the breakdown so you can verify the math.
16.3 Calendar Week Start
Controls whether the calendar starts on Sunday, Monday, or Saturday. Affects both the web and mobile calendar views.
16.4 Accountant Details
| Field | Used for |
|---|---|
| Accountant name | Addressed in the monthly expense report email |
| Accountant email | Recipient of the monthly expense report |
16.5 Notification Preferences
Controls which patient statuses receive automated notifications (email and WhatsApp).
| Patient status | Default |
|---|---|
| Active | Always notified — cannot be disabled |
| Inactive | On |
| Discharged | Off |
| Archived | Off |
Toggle each switch to override the default. Patients with PENDING status are never notified (they have no portal account yet).
16.6 Payment Details (Bank Transfer)
Go to Settings → Payment details to enter your bank-transfer information:
| Field | Description |
|---|---|
| Beneficiary name | Name on the bank account (e.g. your full name or practice name) |
| Bank name | e.g. Bank Hapoalim |
| Branch number | Your bank branch code |
| Account number | Your bank account number |
| IBAN | Optional — for international patients |
| Business / Tax ID (עוסק) | Your business/tax registration number (e.g. עוסק מורשה/פטור number) |
These details are printed on every unpaid invoice PDF so patients can pay by bank transfer. They are not shown on paid invoices or receipts. The Business / Tax ID, however, prints on both invoices and receipts, making receipts valid for Kupat-Holim / insurer reimbursement claims.
16.7 Payment Apps (Bit & PayBox)
Under Settings → Payment details you can also configure Israeli payment apps:
| Field | Description |
|---|---|
| Bit phone number | Patients pay you in Bit by phone number |
| Bit payment link (optional) | Your personal Bit link (https://www.bitpay.co.il/app/me/…). To find it: in the Bit app, open your payment QR ("Payment to…" screen) and scan it with your phone camera (Bit has no copy button). When set, it takes precedence over the phone number and shows as a tappable link + QR. |
| PayBox payment link | Your shareable PayBox link, shown as a link + QR |
Configured apps appear in a "Pay by app" block on unpaid invoices only: on the PDF (links rendered as QR codes) and in the patient portal (tap-to-copy Bit, open-link PayBox). Paid documents and receipts never show them.
These are static links: the platform does not receive payment confirmations from Bit or PayBox. When a patient pays, record the payment on the invoice with the matching method (Bit or PayBox), same as any other payment.
16.8 Clinic Address
Go to Settings → Clinic address to enter your practice address (free text). Once saved:
- Shown on the patient portal — patients can see where to come.
- Included in appointment confirmation emails and calendar (.ics) files — the "Directions" link in a patient's calendar app will navigate to this address.
- Displayed in the mobile patient app on the appointments screen, with an "Open in Maps" link.
For online appointments, the clinic address is not shown — the appointment's online link is used instead.
16.9 Cancellation Notice Window
Go to Settings → Cancellation notice to set how much advance notice a patient must give to cancel their own appointment from the portal or mobile app. Choose one of: Off (no restriction), 12, 24 (default), 48, or 72 hours. If a patient tries to cancel inside the window, the cancel option is hidden and a message explains how many hours' notice is required. Enforced server-side on both web and mobile, so it can't be bypassed from either app.
16.10 Booking Notice Window
Go to Settings → Booking notice to set how far in advance patients must book. Slots starting sooner than the window are simply not offered. Choose one of: Off (book up to the last minute — past slots are still always blocked), 1, 2 (default), 4, or 24 hours. Enforced server-side in your clinic's timezone.
16.11 Minimize Gaps Between Appointments
Go to Settings → Minimize gaps between appointments to control which free slots patients see when booking online — so self-bookings chain onto your existing schedule instead of scattering across the day. Three modes:
- Off (default) — every free slot is offered.
- Strict — only slots directly before or after an existing appointment are offered. On an empty day all slots are offered — the first booking anchors the day's cluster.
- Allow gaps of N+ hours — like Strict, plus slots far enough (2/3/4/6 hours, your choice) from every existing cluster, letting a patient open a separate morning/afternoon cluster.
Also here: Padding between appointments (None, 15 (default), 30, 45, or 60 minutes), kept free before and after every session. Padding is exact, not rounded to the slot grid: in Strict and Allow-gaps, a chained booking is offered at precisely the previous session's end plus the padding (a 09:00–10:00 session with 15-minute padding offers 10:15), and symmetrically before a cluster. A slot freed by a cancellation inside a cluster is automatically re-offered.
Only appointments group bookings together. Leave and blocked time still stop patients booking over them, but they do not act as an anchor — a day whose only busy period is leave stays fully open, rather than collapsing to a couple of slots either side of it. This is deliberate: grouping exists to keep your working day compact, and there is nothing to be gained by booking against the edge of time you are away.
Only patient self-booking is filtered — your own scheduling (web timeline or mobile app) is never restricted.
16.12 Dashboard Language
Go to Settings → Dashboard language and choose English or עברית. This switches the language of your own dashboard only — every page, menu, button, and status message on the web therapist app, laid out right-to-left in Hebrew. It has no effect on what your patients see or receive: each patient's emails, WhatsApp messages, reminders, portal, mobile app, and invoice/receipt PDFs follow the Language set on that patient's own edit page. A Hebrew dashboard sending an invoice to an English-language patient still produces an English document — by design.
The default for every therapist is English; nothing changes until you pick עברית. Clinical content is never translated: session-note bodies, SOAP/DAP section headings inserted into a note, message-template names and bodies, and patient names stay exactly as you typed them. The same setting also sets the language of the emails and push notifications Healix sends to you, and, from therapist app version 1.2.0, the language of the app itself (fully right-to-left in Hebrew). Changing it in the app or on the web changes both.